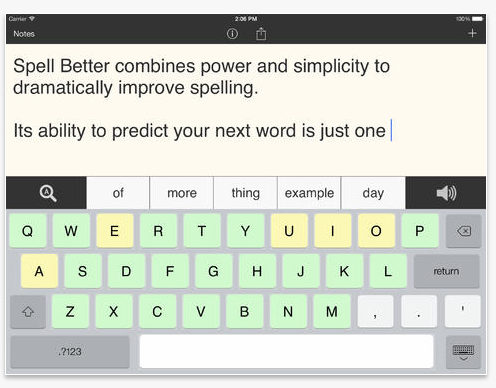
Spell Better app is a free iPad app (upgrade for 9.99) that provides word prediction capabilities with read back /text to speech capabilities. The upgrade provides export options and additional notes. As the function of writing is to publish or share information, the lack of export (locked) in the free version limits use, however, it does have some good qualities:
Phonetic word prediction
Text to speech capabilities
Dictionaries available to look up predicted words (however the definitions can not be read aloud.
Three prediction vocabularies sizes (3,000, 12,000 or 33,000+)
Other options:
Text size, font types
Prediction and speech options
Two background colors (Pale yellow or light gray)
Ability to trial the app for free.
The Open Dyslexic font is also an option in this app which is a benefit for some student reading needs.
Here is a quick video review of Spell Better (free) app, created by the folks at iCATER:
Check it out to determine if this is helpful for your students.
iPads combat elderly loneliness and isolation. Top tips on how to get your older parent using an iPad from UK leading elderly care advice website for carers
Do you have an aging parent or work in geriatrics? Here are some suggestions for using iPad with the aging population. It also includes some research about the ease of reading on an iPad.
Worth the visit if this population is part of your personal or professional life. My personal experience with my mother found the iPad to be an easy to access tool. We also had fun playing some basic visual memory games, reading tongue twisters, puzzles and looking at topics of interest on demand (with Wi-Fi) together. Sharing recent photos of family and taking pictures and videos of her during visits to share with distant family was also a boon! Certainly using an Android device will work for the same purposes with similar type apps.
What did we ever do before mobile devices (practiced the virtue of patience and additional to do lists that now can be at our finger tips?)?
The Brain Book ® System and now My Bionic Brain® a customized life manager/day planner specially designed to meet the complex needs of persons with brain injury – both at home and at work.
Looking for a fresh visual motor app? Kidori produces maze, letter and number apps for iPad , that are graded as easy, intermediate and advanced. Only the Easy Mazes App (works on iPad OS 4.0 – iPad 1 and up) is free, but worth the download. All other levels of apps are 1.99 and may be somewhat pricy given the availability of other similar apps for free, or other apps that provide options and assessment information (Ready to Print, Shelby’s Quest apps) .
The Kidori Free Easy Maze app is clean, simple and appealing for kids who may need some practice with emerging visual motor skills. It offers 24 different mazes within the app. Options available are the width and color of the drawn lines and clear, undo or redo your lines. Mazes are easy to navigate to using the next button and are sequentially graded by difficulty within the app. Completed mazes can be saved to a library within the app which may allow comparison of quality over time for assessment purposes. Single user is the only option.
Here’s a quick video on the app with its features:
Kidori apps promote a Kidori stylus. I was hopeful that this stylus had a solid tip and would be less expensive replacement for the Cosmonaut Stylus , one of my favorite stylus for kids. Unfortunately I found it not be be, with a very flexible tip and appears to be suited to be manipulated (pulling, fun to squish and moving around). I was quite disappointed with the stylus given the 9.99 cost (I wish I could get my $$ reimbursed). Despite the stylus, the free Kidori Free Easy Maze is worth the download if you work with students who are working on early visual motor development. Although there is advertisement for free apps with purchase of the stylus, I have not found that opportunity yet.
Summary:
The free Kidori Easy Maze app for all versions of iPads (iOS 4 and up) provides clean and visually appealing maze activities for students with emergent visual motor skills (preschool level). Additional apps for intermediate and advanced levels are available for 1.99 each. No assessment or multiple user options are available. This is a worth while app for visual motor practice for young learners.
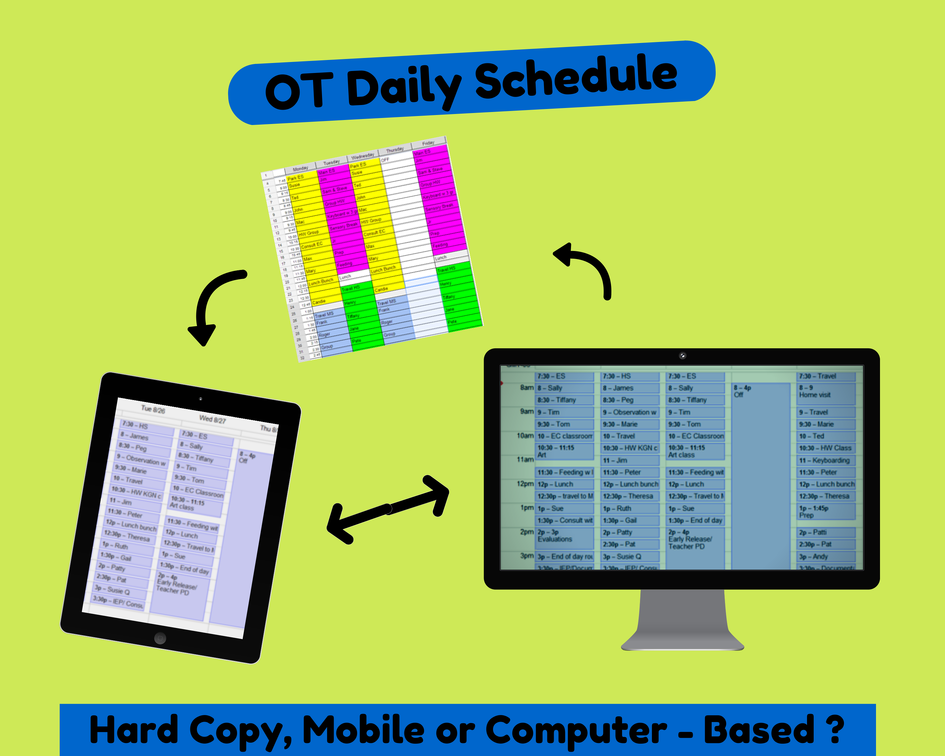
After you have gathered schedules, one of the next important tasks is crafting your schedule and sharing it with the dozens of teachers, administrative staff for accountability. You will need to manage it for your own access which can be by printing, memorizing it, or sending it to an electronic device for reference if you carry one with you for frequent access.
How will you use and share it?
Use a hard copy
Create it for use on a mobile device
Create, share and maintain on your computer?
There are many ways to create, share and maintain your schedule. You most likely have your tried and true schedule templates and methods you’ve used for years to create your schedule. Certainly creating a schedule in electronic format is not a new idea but is the most flexible method to share, edit and revise, a continual process in my experience. Using a Word document (or some other word processing or spreadsheet application) has been standard. In the era of Google accounts in schools, Google may offer a few other options that can be a more efficient method of sharing, revising and accessing therapy schedules using your Google account and apps.
So here are a few options for creating a schedule…
Certainly you can use your same Word schedule template that is familiar, or use the power of Google Doc or Spreadsheets and their apps given that you are a Google for Education School District. Here’s some standard resources and directions for creating a schedule and if unfamiliar with the power of Google, and mobile device management:
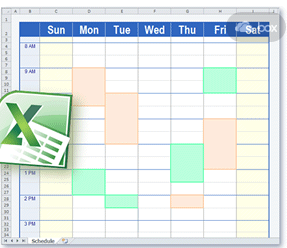
A. Use a Word document/Excel template to create a daily schedule.
The easiest way might be to use your own Word document template you’ve used for years. Call it done.
Don’t want to recreate the wheel? Here are free templates found online at Win Calendar for existing Daily Schedule Templates : Schedules Calendar Templates (free, no sign in required)
If you have your email on your iPad, after sending, open the document on your iPad and save it in Notes or another document management app for referencing through the day.
Another option is to take a photo or screen shot of the schedule and store it in our photo album for reference.
You are done until your schedule changes… tomorrow, then revise in Word, send, print and share again.
B. Google Drive provides a few more options for sharing and creating. Here are a few thoughts that might reduce some steps and allow you to edit your schedule on the fly using your iPad.
Create a schedule in Google Docs (insert a table in a Doc) or Google Spreadsheet.
Don’t want to mess with creating a new daily schedule? Use an existing template with the new Add-ons tool and adding in the Gallery Templates add-on in Google Docs and Presentation. It makes for easy work with the existing templates.
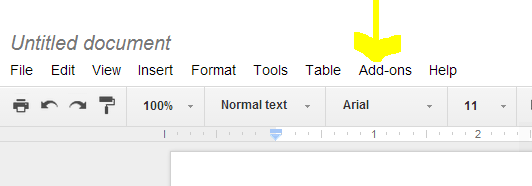
How to get the Gallery Templates Add-ons for Google Docs:
When in Google Docs there is a new menu item, Add – ons. Click on the Add-ons menu. Click on Get Add-ons.
You will be taken to a listing of Add-ons choices. Locate the Gallery Templates Add-on.
Select and Accept the Gallery Template to add this tool to your Google Docs.
The Gallery Templates add-on will be available for your use from the Add-ons menu. Browse the choices of calendars and forms available in the Gallery.
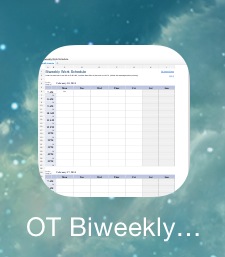
The Gallery’s Planners and Schedules category has weekly schedule and biweekly schedule templates available. Select the template and download a copy to your drive.
Find the template (look for Copy of… documents in your drive. Rename and it is ready to use. You can edit the document or use it as is!
Create your schedule using the schedule template in Google Docs. You now can share it, print it, email it from your Drive.
You can also open it in the Google Doc app on your iPad. It can also be designated as used Offline if Wi-Fi is limited on your device.
The Google Doc can be edited on the fly on your iPad.
Don’t have the iOS Google app? It is free and compatible with iPhone and iPad. A Google Sheets app is also available for free.
Another benefit of using Google Docs is the ability to copy the URL of the document and create a Home Screen icon on your iPad for easy access to your schedule.
Yet another benefit is when you edit the same schedule document/spreadsheet in your Google Drive (not rename it.), the updated versions will still be at this Home Screen icon, on your iPad Google Doc app if it has been sync’d with Wi-Fi or as shared with others.
Don’t want to download or create your own Google Doc OT Schedule right now?
Here is a link to a shared OT Daily Schedule Google Sheet:
Back to School Tips and Tricks – Managing Paper Schedules
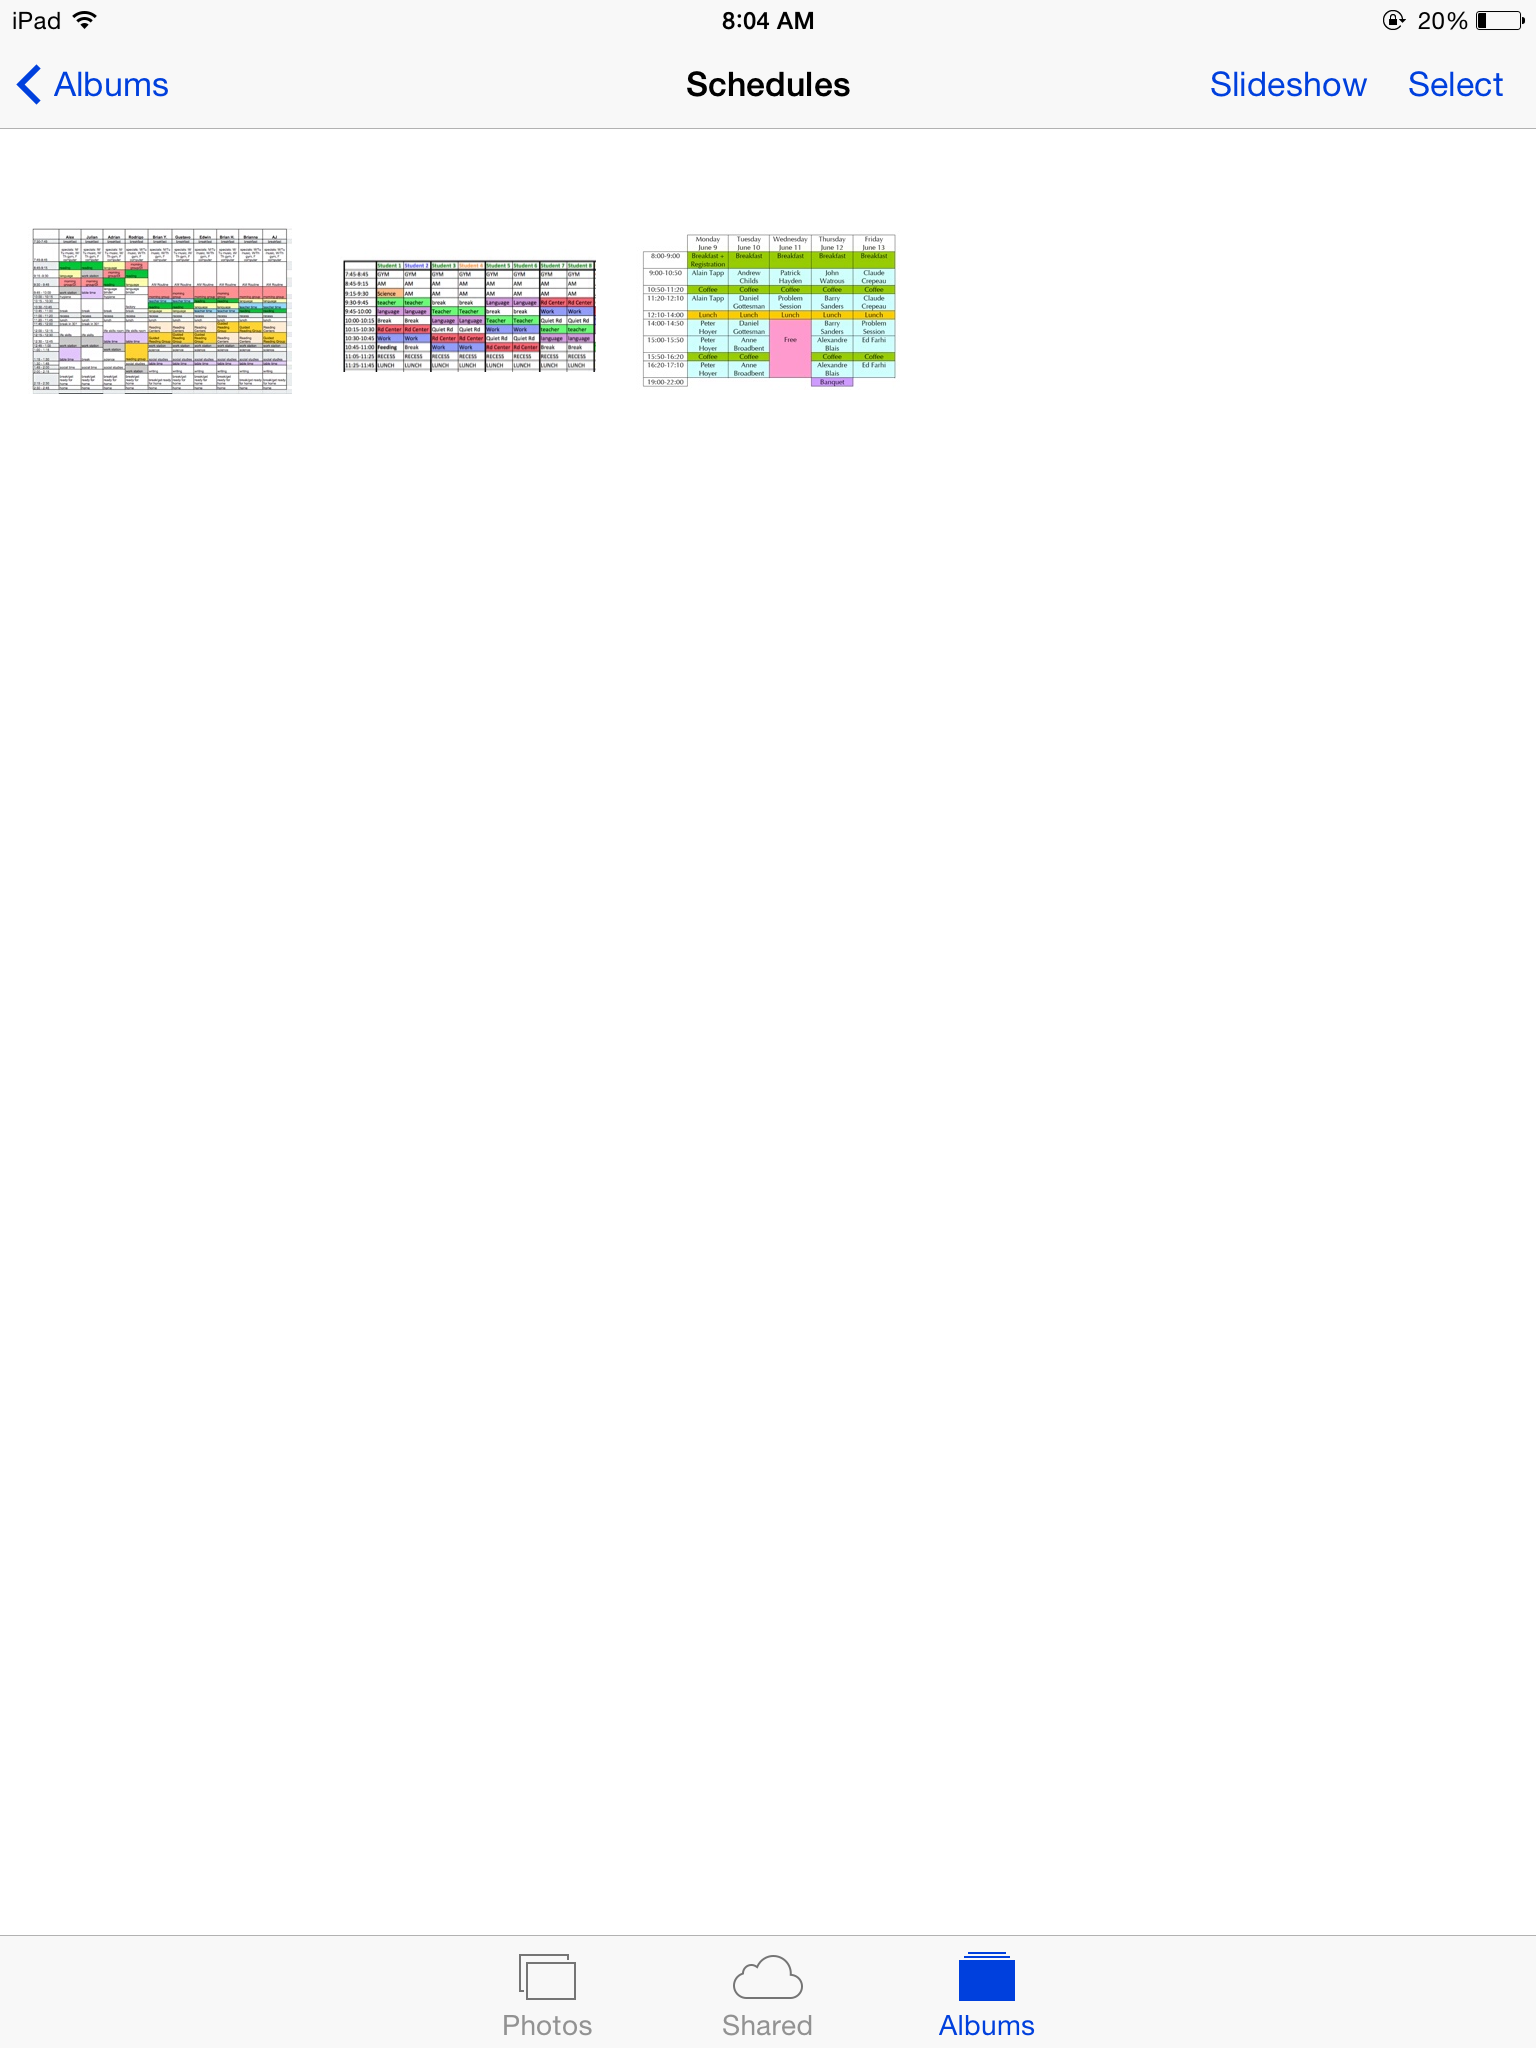
It’s back to school time for students as well as teachers and specialists. As I think about those days and what it takes to get the school year and schedules started, I am reminded of teacher schedules, specialist schedules, building schedules, gym schedules early release day schedules – all needed to create your own OT or teacher schedule! It can be a maze of schedules which you are dependent on to craft your own.
Here are just a few suggestions for mobile device users that can help simplify the paper schedule chase at the beginning or during the school year:
1. Digitize it! –
a. Collect those hard copy teacher, building or related studies schedules on your mobile device by taking a picture with your iPad or Android mobile device. The pictures will be stored in your Photo Album (iPad) or Gallery (Android) for easy access and organization.
b. If it already is digital, have the electronic schedule sent to you. If it is posted out in cyberspace somewhere, navigate to that site and take a screen shot – (that handy trick every OT or teacher should know how to do):
iOS –Press Home + Power Button simultaneously (you will hear a snap shot taken) – a picture of the screen will be sent to your Photo Library.
Android devices (most of them, some differ a bit) Press Power + Down Volume Button (you will hear a snap shot taken)
2. Where did the photos or screen shots go?
iOS photos and screenshots go to your Photo Library.
Android Screenshots go to your Gallery.
3. Organize them! Create an Photo Album of just schedules for easy access in one place on your iPad. Here’s how:
iOS – Go to Photo Library > Albums > “+” creates a new Album call it “Schedules” > Save > Add/Select photos to “Schedules” > Done). All those schedules will be store in one location to refer to when you need to craft yours.
Android – Screenshots images on my Dell Venue (Jelly Bean OS) are collected in the (photo) Gallery and automatically organized in a Screenshot folder (bonus!). If you do a lot of screen shots and need further organization of them there is another way to organize photos by tags using Picasa but is a bit more complicated.
Now you have all of those schedules view-able on your device, on demand and organized. Once they are organized you will be able to find them with a few taps on your device and you are ready to create your own schedule!
Here is a back to school resource for OTA students from St. Catherine’s University in Virgina. The OTA Blogger shares “Six Apps Every OTA Student Should Have“, providing apps on assessment, intervention, study aids and equipment resources.
If you are an OTA student, are these in your OT mTool Kit?
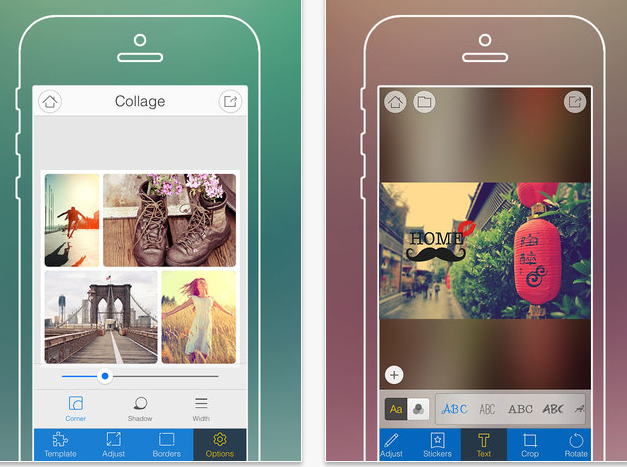
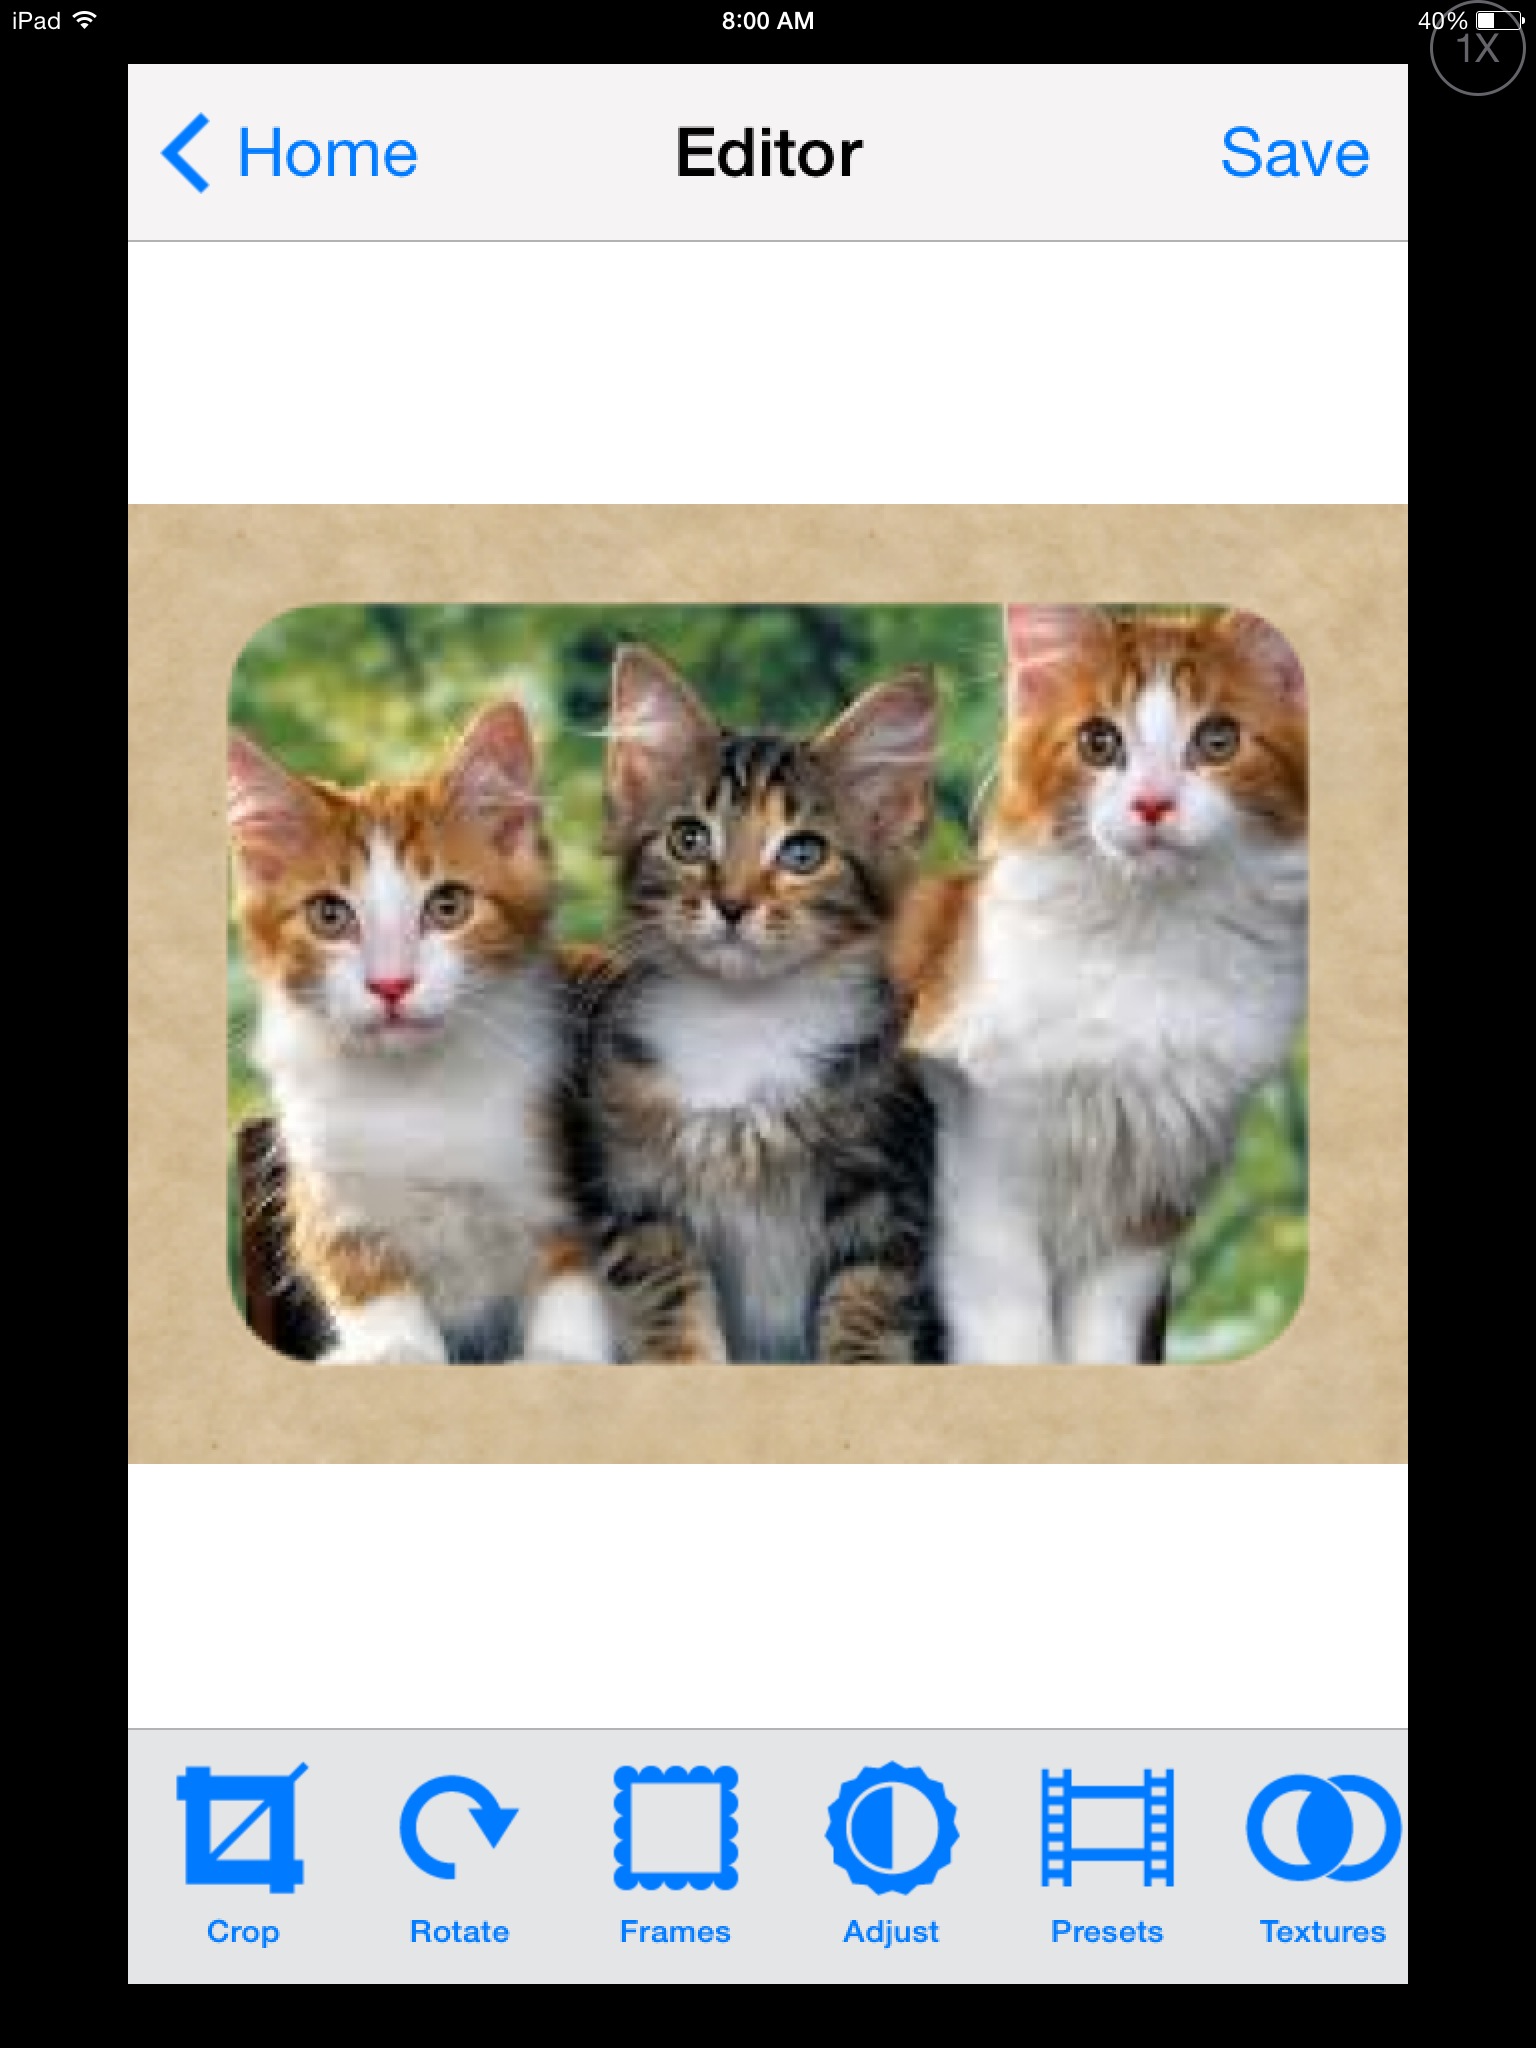
Spiffy Photo Editor app (iPhone/iPad; .99), a photo editing app is currently free. Although not a huge savings, if you are in need of an app to do some photo editing if creating or modifying a book or story for a student, developing a quick social or sensory story, or pictures of the sequence of a task. Having a photo editing app makes the process a lot faster. This app is very easy to use for quick photo editing such as:
Cropping
Frames
Add text
Rotate
Adjust the contrast
Backgrounds and photo effects….
Photos can be take from within the app or existing photos accessed from your Photo Album.
Spiffy Photo Editor app does not have a draw function or stamps tools, but it will allow you to crop it, rotate the picture (ever take pictures that came out sideways, grr…) type text, size and color it and move the text where you. Different fonts and colors for the text are available. Once your photo has been edited a new copy of the edited photo is created from the original photo. A photo can be taken directly within the app or an existing
Spiffy Photo Editor was developed for iPhone so you you can view it 1x or 2x which will fill the iPad screen. It does require iOS 7.0 which should be available to iPad2, 3, 4, and Air. No in-app purchases!
Another free photo editing option is Fotor app, (iPhone, iPad; in-app purchases). Fotor app has a few more bells and whistles such as stamps, creating collages, scenes and effects as well as offer basic editing (add text, rotate, some frames and stamps) without additional purchases.
Although not a difficult to use, Fotor app it does have a few more tools to manage and navigate in my opinion. Photos can be taken from within the app or existing photos accessed from your Photo Album. Fotor app is also available for Android.
So if you are doing some app-smashing (using apps to create and use for another app) for photo editing for storytelling apps, sensory apps, book creating or developing activities for your students or projects, both apps are free (currently) and easy to use.
Binary Labs is known for quality educational apps, and Dexteria Dots 2 readily joins the ranks with exceptional content for kids, and it is also a blast!
Jo Booth, OT provides an extensive review on Teachers with Apps of Binary Lab’s new Dexteria Dots 2 app. I’m excited to use and share this app with participants at the OT’s with Apps Workshop next week. Thank you to Binary Lab’s generousity with promo codes for all of the participants!
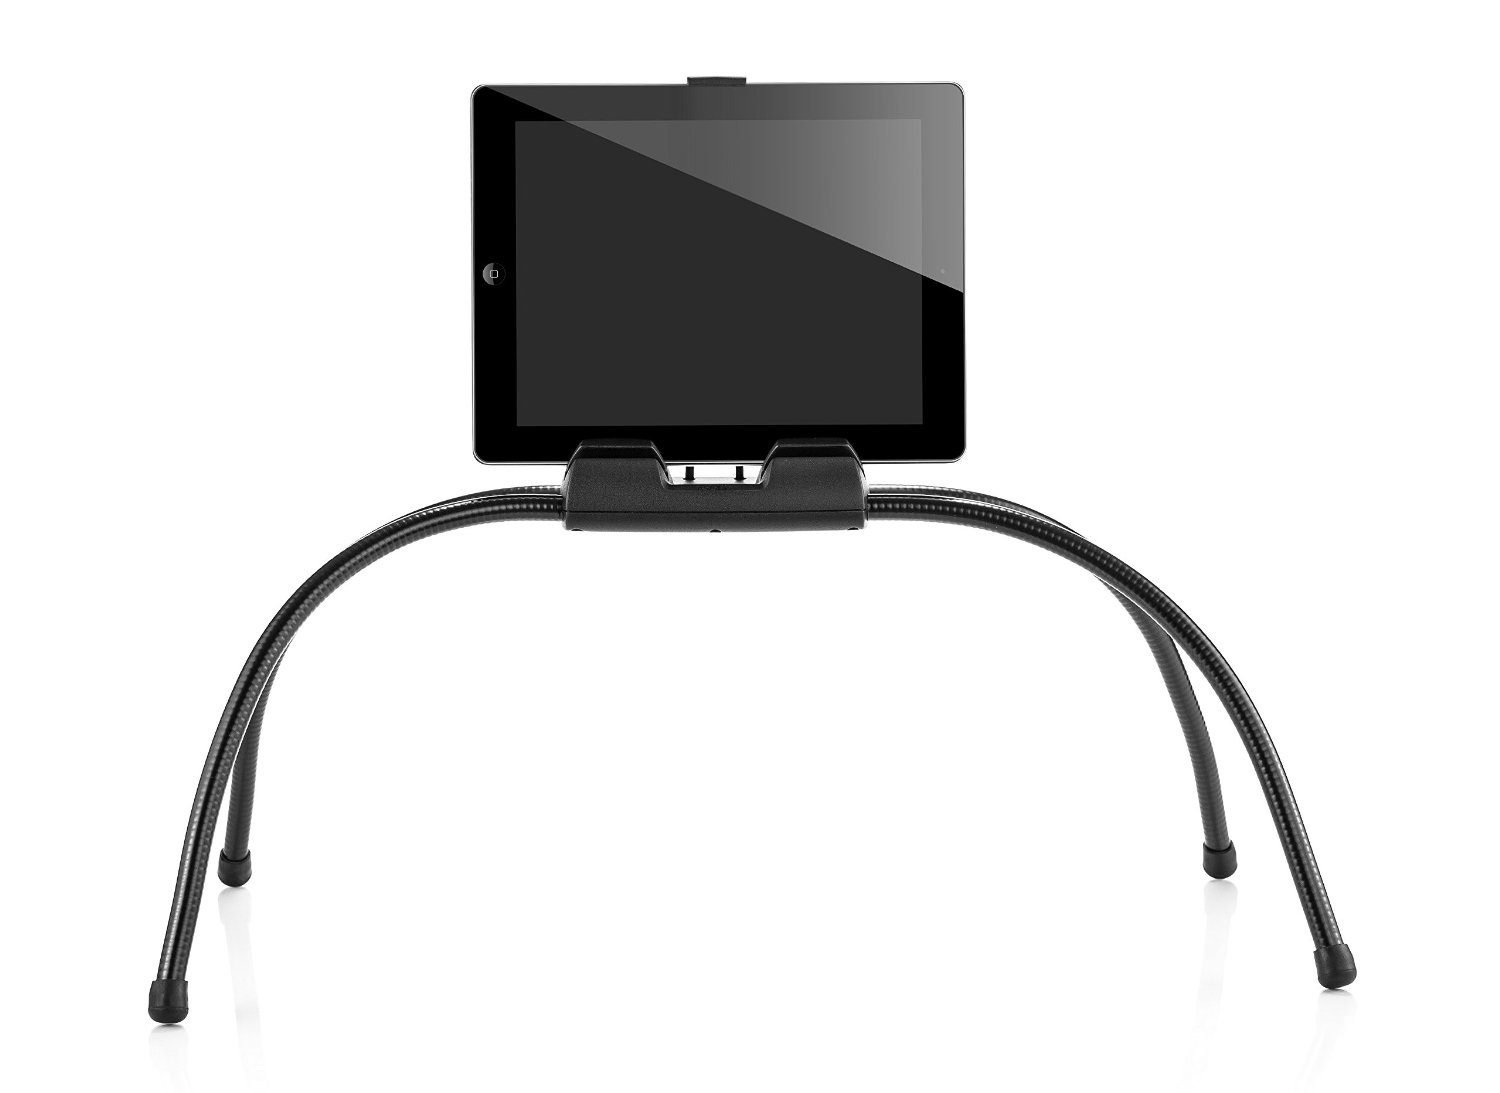
The folks at nbryte generously provided me with a brand spanking new Tablift Stand . Working with a wide variety of clients requires solutions for many different environments. Stands for students tend to be table or desk surfaces whereby stands for adults may require desk or alternative positioning, such as beds, couches or recliners. Finding flexible solutions is always important. The Tablift is a flexible, multi-positioning device for uneven surfaces for all tablets.
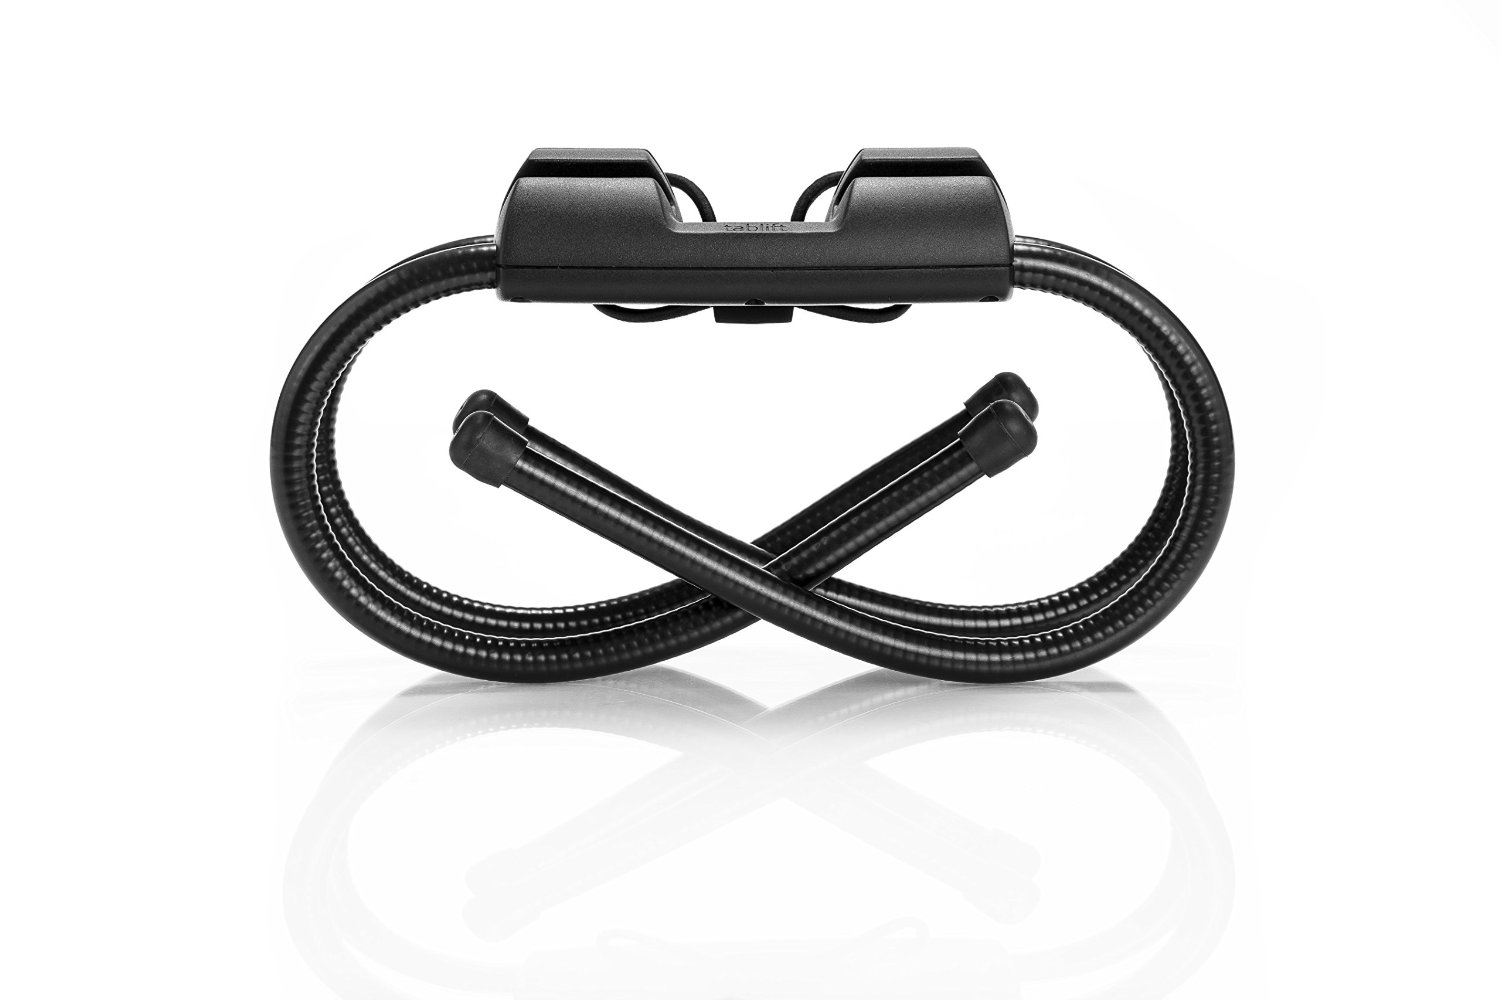
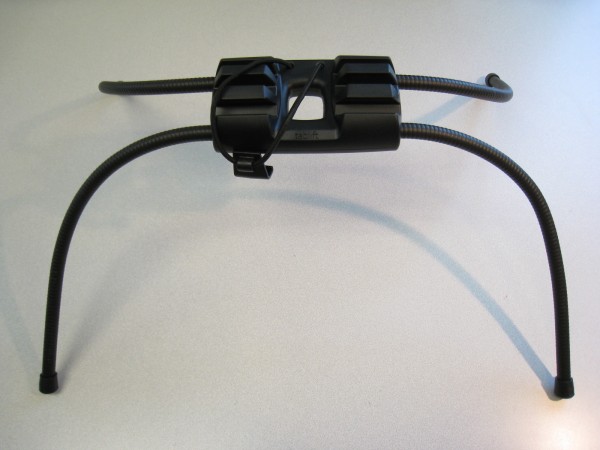
The Tablift Stand has flexible (gooseneck – like) legs for ease of positioning, storing and toting around. Although it has substance (weighs 1-2 pounds), it packs up pretty small offering portability, or small storage space if needed.
The stand features three positions suited to sitting, reclining or lying down. An elastic band with a clip fastens a tablet securely on the device.
Removal of the devices’ case is required for a secure fit in the stand. It advertises as a stand for all tablets. I certainly could not trial all tablets but did use it with several iPads (2,3, Air), Nexus and Dell Venue 8 tablets all which fit securely in the stand. You can reduce the length of the strap that secures the devices by wrapping through the middle of the stand, a really easy and straight forward solution for different sized tablets.
The Tablift Stand is a well engineered stand that affords stability and flexibility for positioning on uneven surfaces as well as viewing for the user. The middle opening also allows availability to charge the device while used.
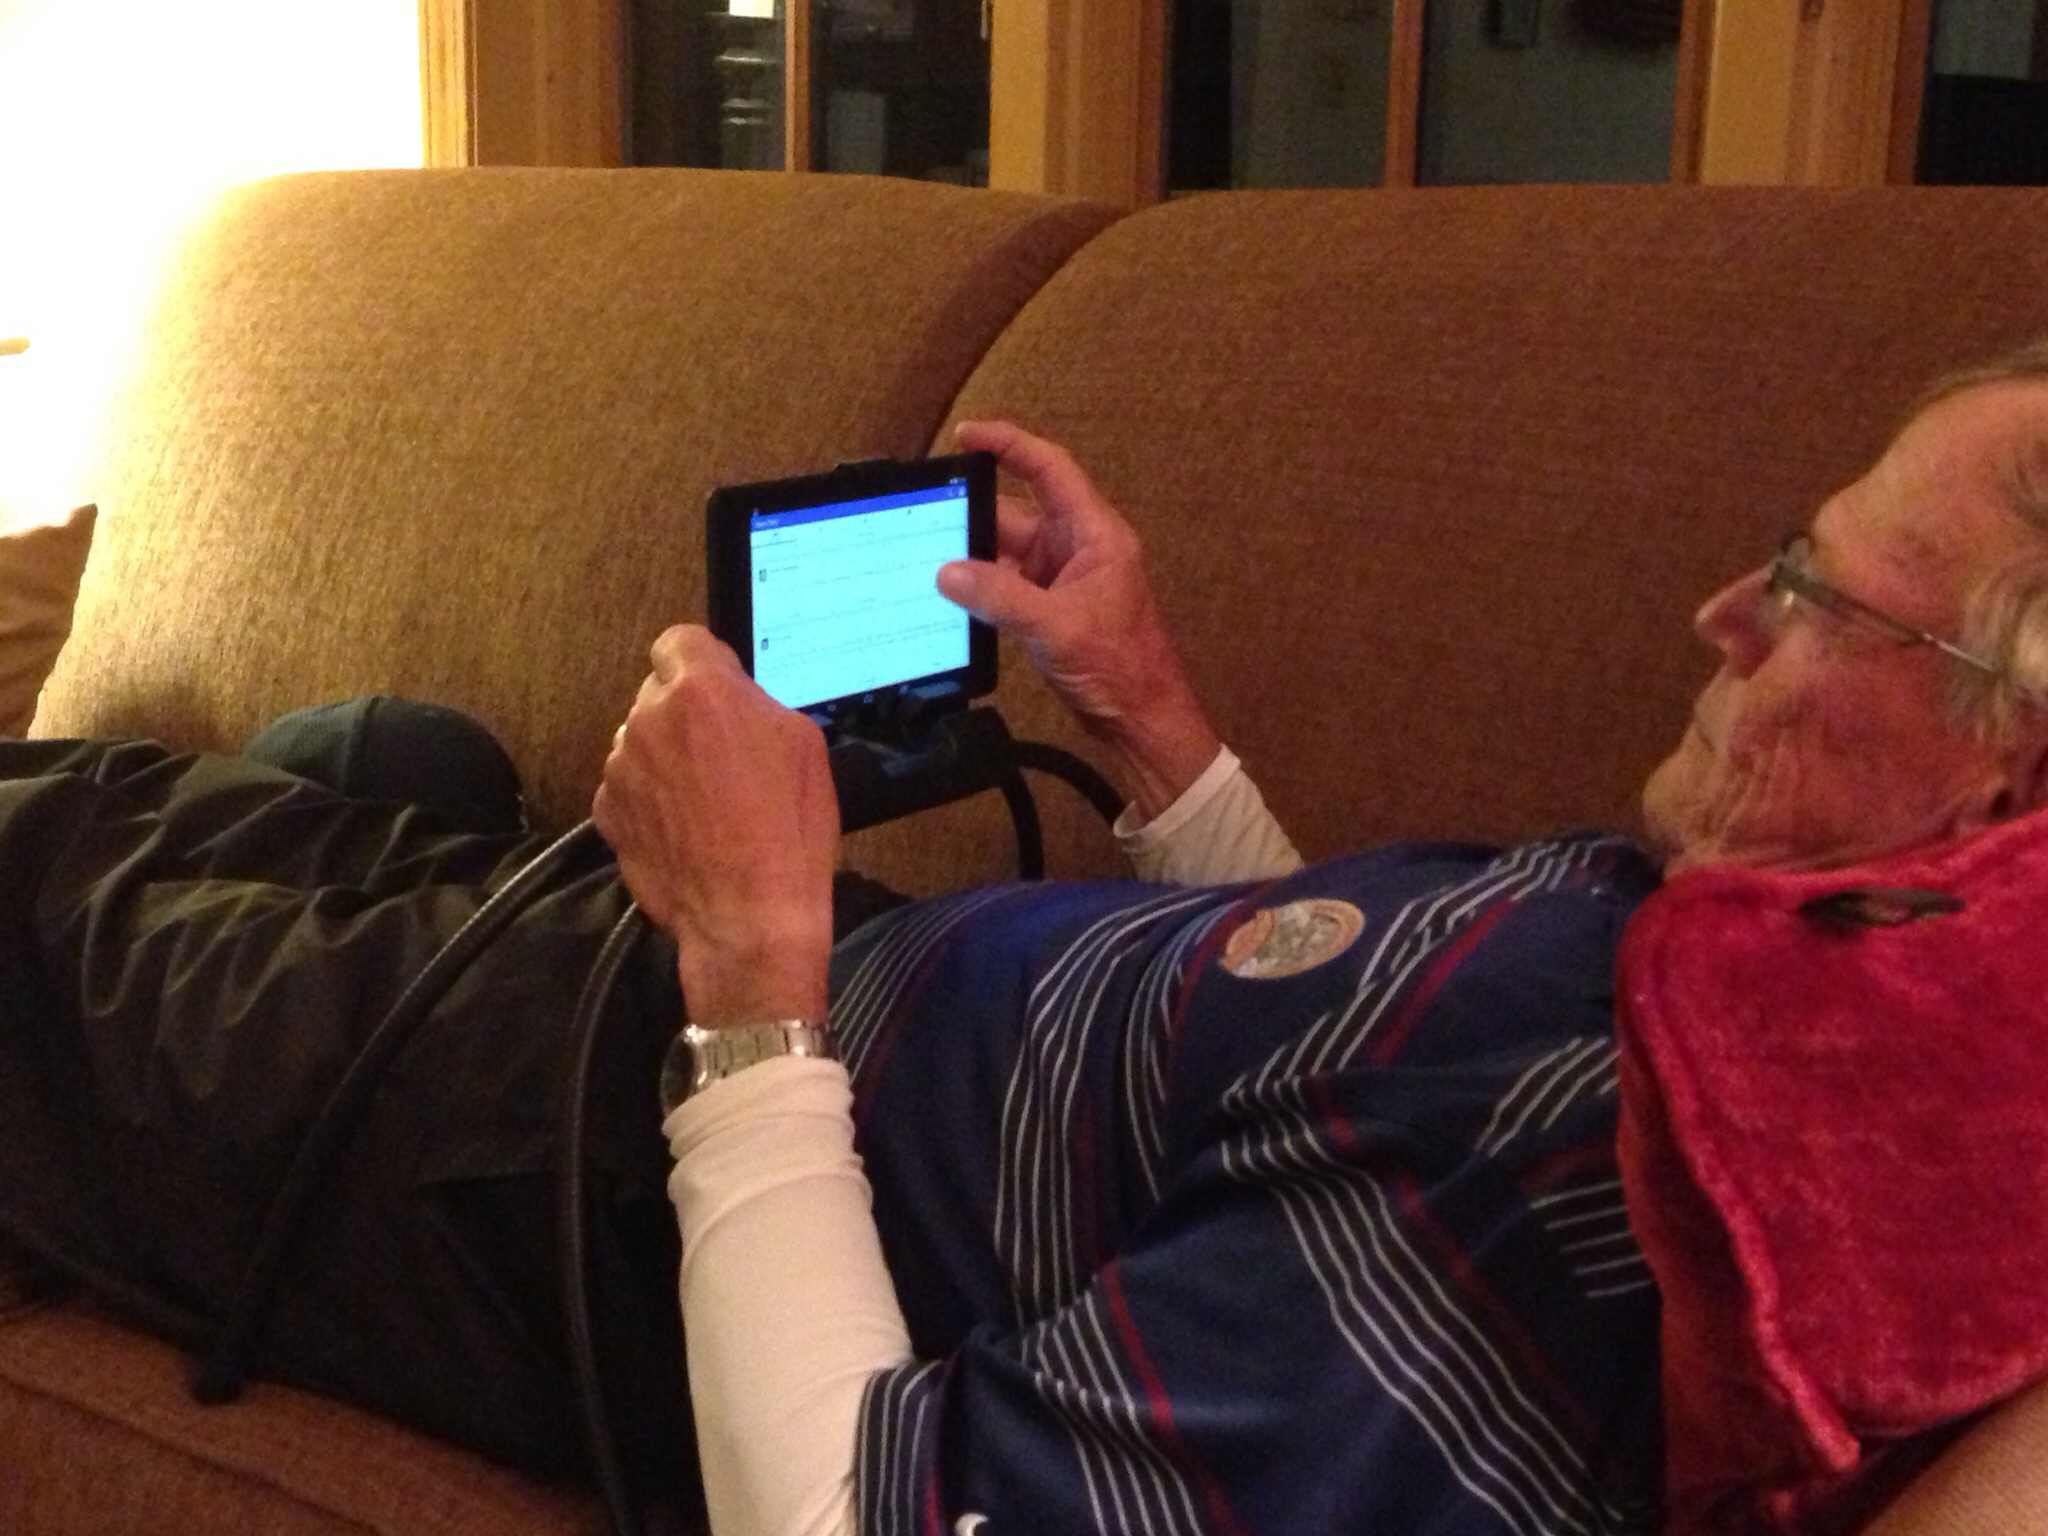
I had some assistance with trial of the stand and was able to observe the position and manipulation with its use. Positioning a device when in a reclined position can require reaching against gravity for operation, depending on the height and placement. This can be a challenge for clients with weakness or pain or just fatiguing for a typical user. Although the user in the picture below does not have motor challenges, it was interesting to observe how the stand legs became a stable resting surface to his arms and hands and how easily a thumb or finger could be positioned to scroll or tap on the touch screen for device navigation. The height and configuration of the stand allowed upper arms to remain supported with hands free for manipulation. Viewing position was comfortable, providing appropriate viewing angle when reclined – especially for us those of us wearing bifocals who experience aging-in-place changes like presbyopia!
The Tablift Stand sells for 59.95 at nbryte.com or Amazon ( temporarily out of stock at Amazon but available at nbyte.com) . Well engineered and adaptable, the stand provides ergonomic positioning options for individuals with disabilities as well as the general public.
Colleagues at Adaptive Technology Resources also trialed the stand with good reviews of its potential for adult clients needing alternative positioning with tablets. As for students use – I’ll find out what other OT’s think about the Tablift Stand at our August apps workshop next week!
What about the general public? Well, I know one user that quickly saw the benefits of the stand. All it took was seeing the stand, one trial and I believe I lost my stand and the couch! This is stand has great universal design features that can be used my many!!
Here is a quick video featuring the Tablift Stand:
Have you tried the new Tablift Stand? If you have, share what you think!


